Image from skyarts.sky.com
Tonight is the last episode of a great programme I have been watching on Sky Arts. Next Great Artist is just the same as Project Runway but (surprise, surprise!) with artists instead of fashion designers. The idea is, each week the artists are given a brief and must complete a work relating to that brief in a set amount of time. The piece is then put into a gallery show where the programmes judges decide who is the winner and who’s “work of art didn’t work” for them (the loser has to go home). In tonight’s final, the three remaining artists have to put on a gallery show. I’m not sure what the theme/brief/rules are yet as there was only a short clip last week. I only guessed one of the finalists which was a bit of a shock, so it will be interesting to see how the other two cope in the final. It’s on tonight on Sky Arts 1 at 8.00pm. I am excited and sad at the same time (I hate it when my favourite TV programmes end!) but my money is on Miles to win. I think he is the judges favourite and he comes across as some sort of young, tortured, artistic genius! Saying that I have liked the concepts behind some of his work, so I don’t mind too much if he does win!
It remind me of another programme on Sky Arts a while ago called Art of Survival, where two teams of two artists and musicians had to travel from Athens to Edinburgh using only their art. They could earn money from busking or sales, or could barter for things like food and accommodation. It was really good but I would definitely be too scared to do it!
Update: 27th April 2012
So I’ve finally watched the last episode of Next Great Artist after having a fight with my Sky+ box! And guess what? I got it wrong! Miles came last, but I sort of thought that he might after seeing his finished work. Peregrine came second and I thought she would win after seeing her finished pieces. The winner was Abdi! I liked his large scale sculptures, but I wasn’t so keen on the negative colour paintings. Overall I really enjoyed this series and I hope they make another one (but not a British version because I hate it when they do that! It’s never as good as the original and visa versa when they make a British show in America. It’s just not the same!)
 It always seems a shame to throw away flowers that someone has bought you, but when they die, they tend to go a bit rotten and manky. I have pressed flowers before, but I find it makes them a little brown and most of the time, the reason I want to preserve the flower in the first place is because of its beautiful colours. This week I managed to dry out some roses and save the petals, it worked really well and there are lots of things you can do with them.
 When the flowers are completely dry (they will feel and sound crispy when you touch them!) you can remove the petals from the stem. This is very easy to do by just pushing up and away from where the petals join the stem. (I’m sure there are scientific names for these plant parts but sorry, I don’t know them!) Try not to get any other plant parts into the mix when doing this, you only want the petals. And that’s it really! I want to keep the scent from my roses, so I put the dried petals into an empty(!) glass jam jar. It’s important to use a glass jar, as plastic containers can do something to contaminate the scent, but I guess if you only want the petals for their colour, plastic would be alright.
 I was going to use these as confetti at a wedding I am going to on Saturday, but I have changed my mind and I’m going to make little scented pouches and maybe mix them with some lavender or herbs. They also look really nice in the jar. If you were to put them into a large kilner jar or a vintage glass jar, I think it would look good on a shelf and add a bit of shabby chic style to a room!
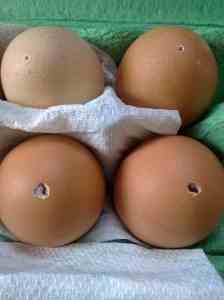
 So the reason that they are Surprise Chocolate Eggs, is that they are made from real eggs! First of all I had to put a small hole in one end of the egg and a larger hole in the other ( I used a large wool needle) and blow out the contents until the shell was empty. (I had omelette for my tea that day!) Next I washed them in hot water and left them to dry overnight in the egg box wrapped, in tissue.The next step involves melting white chocolate to make an outer layer for the chocolate egg.
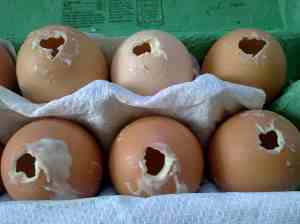
 I melted the chocolate in the microwave and let it cool a little. I then had to put some tape over the small hole in the eggs to stop the chocolate running out. Next came the tricky task of filling the egg. The tutorial showed an egg with a large hole and it being filled by spooning in the chocolate. I thought I would be cleaver and leave the hole quite small and use a squeezy bottle to squeeze the melted chocolate into the egg. It didn’t work!. Don’t try to be clever like me, follow Karon Grieve’s instructions properly, make a large hole in the bottom of the egg and spoon in the melted chocolate! The white chocolate is then swirled around the inside of the shell so that it coats it, but doesn’t fill it up. Then I had to leave the eggs in the box and put them in the fridge for the chocolate to set (this didn’t take very long)
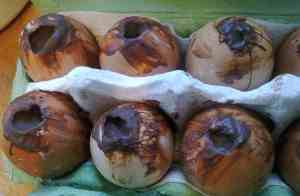
 Next came the milk chocolate. Again I melted it in the microwave andspooned it into the eggs to fill them up to the top! I made ten eggs and used two, two hundred gram bars of milk chocolate for five eggs. Saying that, I only used one bar of white for the outer shell, so next time I would use more white chocolate as I don’t think it will have given the same effect as the picture in the tutorial. After setting the eggs in the fridge, I cleaned up the shells with a damp scouring pad and then tried to decorate them using painted on food colouring. However, I left this on overnight and it was still wet so I wiped it off which left a slight tint to the eggs, which was quite nice.